
WordPress without a CDN is a bad idea. Google penalizes you for slowness. Customers abandon your site because they won’t wait for the site to load. Period. MaxCDN, CloudFlare and WordPress together in harmony? Lets find out! (more…)
Category: WordPress
WordPress
-
How to backup the Apache config file
UpdraftPlus and other WP backup solution’s safeguards the work you have performed in WordPress. The Apache configuration files are left out. When disaster strikes, access to the Apache config files is invaluable. This might save you hours and perhaps days of downtime and frustration.
Automate the process
Below is the command listed one by one.
A shell script that runs once a month from Cron would automate this.
With TextExpander could you run this command sequence from your PC, Mac, iPhone and iPad as a snippet. To distinguish and automatically sort the backups the folders and filenames start with today’s date in the form: year-month-daySave the backup files in a single folder
Create a folder you can access with SFTP and SCP. Then it’s easier to move the backup offsite. Either to your PC or another server or service. If you also choose to keep a local backup on the WP-JeOS server remember to change permissions on the file and folders. The bad guys would just love access to your SSL-certificates!
cd /home/ubuntu/
mkdir 20160627-backup-wp-jeos
cd 20160627-backup-wp-jeos
Now we are ready to start the work creating a backup of the Apache config files.
Backing up SSL certificates
Create a backup of the certificates
sudo zip -r 20160627-etc-ssl-certs-.zip /etc/ssl/certs/*.*
Create a backup of the private certificates
First become rootsudo su
Then create the zip file:
sudo zip -r 20160627-etc-ssl-private-.zip /etc/ssl/private/*.*
Go back to the user ubuntu
exit
Backing up Apache main config file
You have appropriately modified the main Apache config file to make the .htacces file work correctly.
sudo zip 20160627-etc-apache2-apache2-conf.zip /etc/apache2/apache2.conf
Backing up the virtual hosts config files
The virtual hosts configuration files for each and every WordPress site might take much work to re-create when disaster strikes. A backup is a real time saver. The .conf file contains the path to your SSL-certificates, specifies the filename of your error logs and access logs and info about the root folder of WordPress.
sudo zip -r 20160627-etc-apache2-sites-available-.zip /etc/apache2/sites-available/*.*
Backup of the Apache config files completed. Now create a TextExpander snippet and perhaps a batch job to perform this fast next time you modify them. A cron job based on the bash script would further automate.
Manually backing up WP-JeOS
When you are at it, backing up the rest of WP-JeOs is easy. Sometimes backups are un-restorable. It could be many reasons for that. Having backups created with different solutions could be wise.
Backing up the file structure
When you have many websites creating a zip-file of the structure is done with this command. Beware. The zip-file could end up to being massive.
sudo zip -r 20160627-var-www-.zip /var/www/
A real timesaver when you need to migrate the whole server. It would usually take less time than restoring one site at a time with UpdraftPlus. Keep in mind that WP-CLI and WordShell are great tools when migrating, creating backups and restoring. WordShell has an excellent integrated backup solution.
Backing up databases
Since we run Amazon RDS MySQL, backup of the databases is less critical. Amazon automatically creates database backups for you. Use the RDS control panel to configures database backups. Modify to fit your needs. Eventually, the RDS backups are overwritten. If it takes months to the problem, corruption or whatever goes wrong is detected. Then a local offsite backup is the only thing that can come to your rescue. Creating backups with free software is easy. Try these:
- MySQL Workbench
- Sequel Pro
- Navicat
Move the backup offsite
Backup files on a server that you can not access are worthless. Copy or move the backup offsite to another server or service like DropBox, Google Drive or Amazon S3. You never know what’s ahead.
Verify the backup
Download the backup to your PC. Unzip the files to verify that the zip files contains the intended content.
Restore to a local VPS
VmWare is a great tool. Test that you can regenerate the server to a new VPS running on your PC. VmWare is a user-friendly tool for running Ubuntu on you local workstation. Restoring backups requires practice. It could occur that you are unable to restore a backup. The backup might be incomplete or corrupt. You could run into unforeseen problems when restoring backups. There might be a 3. party plugins or locked software that requires a particular IP to work. Certificates that is locked to a certain environment. It could be many obstacles occurring that you could not foresee or has forgotten. Usually, disaster recovery is a very stressful situation that in the long term is damaging to your health. Practice enables you to perform migration faster and with less wear and tear on your health.
Protect the backup
If you keep backups on the WP-JeOs, then you should change the permissions to the files and folders. The backup contains your passwords, SSL-certs and lots of valuable stuff that the bad guys just would love to access.
-
Update WordPress, plugins and themes using WP-CLI and Cron
Using CRON to automatically update themes, plugins and WordPress core saves you a lot of time and will keep your sites and server secure.
-
How to add Google Tag Manager code to the Thesis 2.1 WordPress framework and theme
Tidy up your code and gather all your stats and conversions tags in one place. Manage tags for all your websites in one place.
- Google Analytics
- Google AdWords remarketing
- Google Adwords conversion
- Facebook ads tracking
- Twitter ads tracking
- Microsoft Bing Ad Center ads tracking
- Linked In ads tracking
- – and much more
Adding tags without efficient management would potentially cause trouble. All that code bogs down your site. Redundant or incorrectly applied tags can distort your measurement and result in duplicate costs or missing data. And it can be time-consuming for the IT department or webmaster team to add new tags, which means important marketing and measurement programs could suffer from delay. With Google Tag Manager, you eliminate these problems—and run your campaigns when you need them.
Google Tag Manager
http://www.Google.com/tagmanager/ WordPress plugin to add extra functionality to Tag Manager, Google Analytics, AdWords and more:
https://WordPress.org/plugins/duracelltomi-google-tag- manager/ Tips on how to use the plugin
http://DuracellTomi.com/Thesis is the ultimate design and template manager for WordPress
http://DIYthemes.comYou need to add the PHP code below in the file named
custom.php
This PHP-file is available in the folder:
/wp-content/thesis/skins/YOUR-THEME-NAME/custom.php
I use a theme from http://Themedy.com called Junction 2
The path to my custom.php is:
/wp-content/thesis/skins/junction-t2/custom.php
This is the PHP code to add to your custom.php file in Thesis:
// Google TagManager START
function injectTagManager() {
?>

<?php if ( function_exists( 'gtm4wp_the_gtm_tag' ) ) { gtm4wp_the_gtm_tag(); } ?>


<?php
}

add_action('hook_before_html','injectTagManager');


function injectDataLayer() {
?>
<script>
var dataLayer = [];
</script>
<?php
}


add_action('wp_head','injectDataLayer');

// Google TagManager STOPP
If you don’t want to use the WordPress plugin, and instead place the full Google Tag Manager code, please use this code:
// Google TagManager START function injectTagManager() { ?> <!-- Google Tag Manager --> <noscript><iframe src="//www.googletagmanager.com/ns.html?id=GTM-XXXXX" height="0" width="0" style="display:none;visibility:hidden"></iframe></noscript> <script>(function(w,d,s,l,i){w[l]=w[l]||[];w[l].push({'gtm.start': new Date().getTime(),event:'gtm.js'});var f=d.getElementsByTagName(s)[0], j=d.createElement(s),dl=l!='dataLayer'?'&l='+l:'';j.async=true;j.src= '//www.googletagmanager.com/gtm.js?id='+i+dl;f.parentNode.insertBefore(j,f); })(window,document,'script','dataLayer','GTM-XXXXX');</script> <!-- End Google Tag Manager --> <?php } add_action('hook_before_html','injectTagManager'); function injectDataLayer() { ?> <script> var dataLayer = []; </script> <?php } add_action('wp_head','injectDataLayer'); // Google TagManager STOPP -
How to install WordPress through command-line with WP-CLI
Setting up WordPress using the command line is fast.
You can even use a script to automate the process.
Table of contentsPrerequisites and preparations
Before you begin. Create a MySQL database in Amazon RDS. You also need a working website. Then start creating a list with the following information:
- Name of your Amazon RDS MySQL database server
- Database name
- Database username
- Database user password
- The WordPress admin username you intend to use
- The WordPress admin password you intend to use
- The WordPress admin e-mail address you plan to use
If some points are unclear these how-tos should point you in the right direction:
How to install WP-CLIHow to set up a virtual host
How to activate .htaccess
How to create a MySQL database in Amazon RDS
Verify the root folder
Your root folder is beneath
/var/www/
In this tutorial are we going to install WordPress in the folder
/var/www/MyDomain1.com
Start with going to the root folder:
cd /var/www/MyDomain1.com
Verify that there are no files in this folder
sudo ls
If here is index.html or another start page file there you should delete this file to avoid problems later on.
sudo -u www-data rm index.html
Change ownership and delegate permissions
The Apache web server needs permission to run WordPress.
sudo chown -R www-data /var/www/MyDomain1.com
Download the installations files
Downloading all the WordPress files is done in a matter of seconds by issuing this command:
wp core download
Create wp-config.php, the main configuration file
Sometimes WP-CLI is unable to connect to Amazon RDS MySQL database. Then you can skip the database test by adding the following statement:
--skip-check
Creating the configuration file in WordPress. Fill in the values from the list you created previously:
wp core config --dbname=wordpress --dbuser=user --dbpass=password --dbhost=dcfgvr.1bagob.0002.euw1.cache.amazonaws.com --dbprefix=wp_ --skip-check
Install WordPress
wp core install --url="https://www.example.com" --title="Blog Title" --admin_user="adminuser" --admin_password="password" --admin_email="email@domain.com"
Check the server error logs
It’s a good practice to examine the error logs. They are here:
cd /var/log/apache2/
sudo nano error.log
sudo nano 01-mydomain1-com-error.log
Set correct permissions so Apache can access the files and folders
Basic permission:
sudo chown -R www-data /var/www/MyDomain1.com
More thorogh guide on setting permissions is available her:
-

Tune apache performance using Apache MPM prefork module
There could be many reasons why your Apache web server is slow. One of them can be that Apache needs tuning. Tuning the Apache performance using the Apache MPM prefork module is one of them.
Tune Apache performance using MPM Prefork module
StartServers: 30% of MaxClients
MinSpareServers: 5% of MaxClients
MaxSpareServers: 10% of MaxClients
MaxRequestWorkers = MaxClients
MaxConnectionsPerChild= 10000 (To avoid problem with memory leaks in WordPress plugin themes and apps)
Edit the file with this command:sudo nano /etc/apache2/mods-available/mpm_prefork.conf
Try these values if Apache uses 70 MB under heavy load and the server has 1 GB RAM.
<IfModule mpm_prefork_module>
 StartServers 8
 MinSpareServers 8
 MaxSpareServers 9
 MaxRequestWorkers 9
 MaxConnectionsPerChild 100
</IfModule>
Save the changes
Ctrl+X - Y
Restart Apache
sudo service apache2 restart
It might make the server a bit slower, but there will be the most available memory, and you will not hit the roof. Hitting the limit will almost stop the server.
How to calculate the values
The initial Ubuntu OS install uses 350 MB RAM – memory – and the server has 1 GB with memory.
Then there is half a gigabyte to run Apache clients.
You measure that each Apache instance uses 33 MB of memory. Then you would be able to run 18 servers with 650 MB available RAM. 650 MB RAM allows ten customers to download content from your site simultaneously. Often the browser uses several simultaneous instances so one user could use several Apache instances. Upgrade to 4 GB of RAM then you would have 3.5 GB available to serve your customers with Apache. 3,5 GB of available memory would suggest a “MaxClients” settings increased from ten clients to 106.
Tool nr 1 to help you determine a useful configuration
Check Apache Httpd MPM Config Limits
This Perl script compares the size of running Apache HTTP processes. This consist of the configured Prefork, worker and event MPM limits. Measured towards the server’s available memory. You might get an error message if the setting limits exceed the server’s available memory.
Check the website for the newest release.
https://code.google.com/archive/p/check-httpd-limits/downloads
Go to the user home folder
cd ~
Create a folder
mkdir apache-memory-test
Go to the newly created folder
cd apache-memory-test
Download the latest version. This is for version 2.5:
wget https://storage.googleapis.com/google-code-archive-downloads/v2/code.google.com/check-httpd-limits/check_httpd_limits-2.5.zip
Unzip the file
unzip check_httpd_limits-2.5.zip
Make the script executable:
chmod u+x check_httpd_limits.pl
Run the script as root
sudo ./check_httpd_limits.pl
Open a bunch of web pages while you run the script many times to get an impression of the average memory consumed.
Tool number 2
Please read this tutorial about oApache” performance using optimizing MPM Prefork module
Create a folder and download and unzip the script as you did with “Tool 1”
Make the script executable
chmod u+x ap.sh
Run the script
./ap.sh
Sources for this article
-

How to activate SSL with a free valid certificate
How to allow multiple SSL hosts on a single IP in Ubuntu
Open the file:
sudo nano /etc/apache2/ports.conf
Find the following line:
<IfModule ssl_module>
Listen 443
and change it to:
<IfModule ssl_module>
Listen 443
SSLStrictSNIVHostCheck off
Then restart Apache
service apache2 restart
To activate and de-activate SSL
Activate SSL by typing the command
sudo a2enmod ssl
Then restart Apache to publish the change
service apache2 restart
[themedy_button url=”https://www.wpjeos.no/how-to-add-a-websites-to-ec2-ubuntu-lts-instances/” icon=”wrench” font_awesome_att=”” label=”How to set up virtual websites and domains with SSL” colour=”blue” colour_custom=”” size=”large” edge=”rounded” target=”_self”]
How to get free SSL certificates
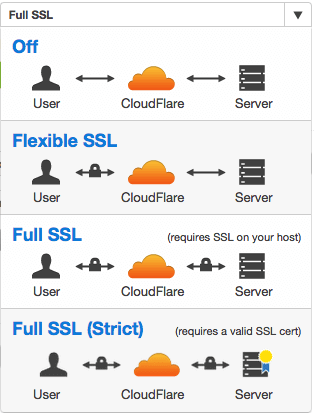
Claim your free SSL certificate on CloudFlare.com by choosing “Full SSL” in the menu. You can use the free not valid SSL certificate in Ubuntu together with the free valid certificate you get from CloudFlare. SSL will give you better SEO ranking on Google. This is the fastest and easiest way to get a valid SSL on your VPS. By leaving most of the process to the cloud in the spirit of JeOS. The easiest is to choose the “Full SSL” option. The you can use the native not valid Ubuntu certificates.
Strict mode full SSL
If you generate certificates in the CloudFlare admin panel and install them in Ubuntu, then you should use the Full SSL (Strict) choice. Your site is encrypted in either choice.
The Let’s Encrypt project
An alternative to CloudFlare is to acquire your free SSL certificate from the Let’s Encrypt project. Let’s Encrypt is a free, automated, and open certificate authority.
[themedy_button url=”https://www.wpjeos.no/how-to-add-a-websites-to-ec2-ubuntu-lts-instances/” icon=”wrench” font_awesome_att=”” label=”How to set up virtual websites and domains with SSL” colour=”blue” colour_custom=”” size=”large” edge=”rounded” target=”_self”]