How to optimize WordPress with Ubuntu VPS

Ubuntu Virtual Private Server optimized for WordPress

Category: Developer tips

  • How to edit the hosts file from a graphical interface

    How to edit the hosts file from a graphical interface

    Being able to edit the hosts file is a valuable tool for any web developer. If you are a http://CloudFlare.com customer, you can bypass the CloudFlare systems by using a hosts file and direct the traffic directly from your computer is to the server. If you are moving WordPress site from one server to another server, then you can test that the website works correctly on the new server before you change the DNS setting. This way you can avoid any downtime the service. The hosts file enables you to create a website before the domain is effective or before the domain is being registered. Reason for this is that the host file will override the DNS services. You can also create our update website locally on your computer while the production site is still running on the Internet.

    With at graphical user interface for the hosts file changes are made in a snap, and you can reload so that the services takes effect immediately. Here is a list over MAC and Windows Graphical Interface.

     

    hostbuddy-featured

    Mac

    http://clickontyler.com/hostbuddy/

    Hostbuddy is the easiest way to manage and update the /etc/hosts file on your Mac. Add new entries and turn on and off existing ones with one click. It’s perfect for switching between staging and production servers or just for testing out your new website before it goes live.
    You should actively use the hosts file already on your computer.
    What it Does

    • Quickly add host entries without using the command line
    • Turn on/off host groups with one click
    • Won’t overwrite your existing /etc/hosts file
    • Compatible with VirtualHostX
    • Automatically flushes your DNS cache

    40003_scr_sm

    Hosts

    http://www.macupdate.com/app/mac/40003/hosts

    Hosts are a system preference pane to manage your hosts file.
    Hosts add a preference pane to your system preferences which let you toggle your host file entries on and off, as well as add and remove them.

    Hosts.prefpane likes to keep your hosts file clean. When an entry is toggled off, it is not commented out in the hosts file but instead stored in the app’s preferences storage. This means you will have to uncomment all your unused host entries and untoggle them in the pane if you want to use them. Comments are treated as comments and will never show up in the list of host entries!

    Of course, Hosts.prefpane will detect edits you made to the /etc/hosts directly and merge them into the listing.

    Backups of your hosts file is made in ~/Library/Application Support/Hosts. The backup or your hosts file from before you started using Hosts.prefpane is called hosts.orig and each session a backup is made called hosts.session.

    The default host entries that are needed by the OS are hidden and can not be edited using Hosts.prefpane.


    Windows



    Blue_life_hosts_editor
    BlueLifeHosts editor

    http://www.sordum.org/8266/bluelifehosts-editor-v1-2/

    Blue life hosts editor is a Portable Freeware hosts-file editor. It Allows you to add easily/delete, Block, Update domain names to your hosts file. Simply type the hostname you wish to add and use “Resolve domain name and add into the list” button.

    When you type a domain name in your browser that you wish to connect to, your application must first convert it to an IP address that it will use to connect to.The way these hostnames are resolved to their mapped IP address is called Domain Name Resolution. On almost all operating systems whether they are Apple, Linux, Unix, Netware, or Windows the majority of resolutions from domain names to IP addresses are done through a procedure called DNS. DNS stands for Domain Name System. IT is the standard domain name resolution service used on the Internet. There is another way to resolve domain names without using the Domain Name System, and that is by using your HOSTS file. Almost every operating system that communicates via TCP/IP, the standard of communication on the Internet, has a file called the HOSTS file. This file allows you to create mappings between domain names and IP addresses Another way to think of a hosts file is like an address translator and redirector.


    HostsMan_4.2_001

    HostsMan

    http://www.abelhadigital.com/hostsman
    HostsMan is a freeware application that lets you manage your Hosts file with ease.
    Easy way to manage your host file with a GUI on any windows computer.
    While you can always manually manage or edit Hosts file manually, I would like to suggest that you use a third-party freeware tool like HostsMan to do it.
    HostsMan is a feature-rich tool that lets you add, remove, edit entries in the Hosts file. It also lets you easily add third-party Hosts lists that help in blocking malware sites and lets you easily enable or disable the hosts file. It includes a built-in hosts file updater & a hosts editor. It lets you scan the hosts file for errors, duplicates and possible hijacks – and also lets you create an Exclusion list. One more useful feature it offers is the Hosts file backup manager. Back up your Hosts file to a safe place and use it to restore it, should the need arise.

    Features

    • Built-in hosts file updater
    • Enable/Disable hosts file
    • Built-in hosts editor
    • Scan hosts for errors, duplicates and possible hijacks
    • Hosts file backup manager
    • Exclusion list
    • Hostman also lets you Flush DNS cache.
    • Open Hosts with a text editor
    • Count the number of hosts
    • Find duplicates
    • Replace IP
    • Scan hosts for malicious entries
    • Rearrange hosts
    • Manage DNS Client Service
    • And more.
    • In short, it’s the only Hosts Manager that you will even need.
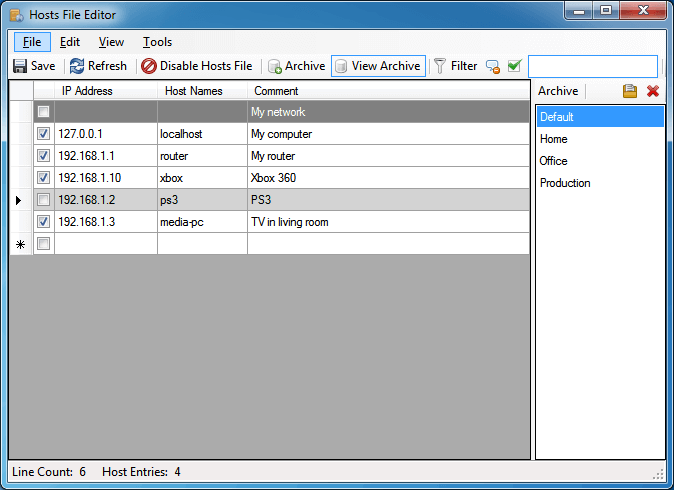


    hosts_file_editor

    Hosts File Editor

    http://hostsfileeditor.codeplex.com

    Hosts File Editor makes it easy to change your hosts file as well as archive multiple versions for easy retrieval.

  • Include sitemap in HTML format (The required PHP XSL Module is not installed) error in XML Sitemap Generator for WordPress

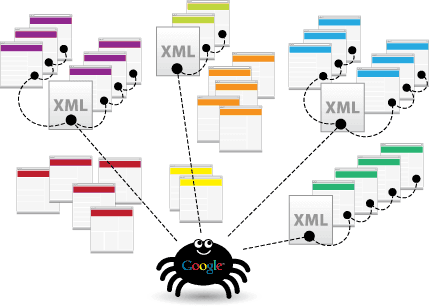
    In WordPress XML sitemap is mandatory to get listed with new pages with Google and Microsoft Bing

    Include sitemap in HTML format (The required PHP XSL Module is not installed)

    Include sitemap in HTML format (The required PHP XSL Module is not installed)

    This post applies to the WordPress plugin;

    Google XML Sitemaps

    from developer:

    Arne Brachhold


    [themedy_alertbox icon=”thumbs-o-up” colour=”green” font_awesome_att=”” custom_colour=””]
    Call TBT when you need help
    Ask for a quote. We are always here to help. We also work by the hour at $ 99,- USD. We accept payments by PayPal.
    [/themedy_alertbox]


    The dialog box «Include sitemap in HTML»  is unavailable

    If you are using the XML Sitemap Generator for WordPress 4.0.2 on Ubunt and are unable to tick the box “Include sitemap in HTML format” then you might get this error message:

    Include sitemap in HTML format (The required PHP XSL Module is not installed)

    On Ubuntu you can solv this by typing

    sudo apt-get install php5-xsl

    After the installation is done you need to restart Apache:

    sudo service apache2 restart

    The reload the setting page, and you should be able to tick the box.

    Google xml sitemaps by Arne Brachhold

    [themedy_alertbox icon=”thumbs-o-up” colour=”green” font_awesome_att=”” custom_colour=””]
    Call TBT when you need help
    Ask for a quote. We are always here to help. We also work by the hour at $ 99,- USD. We accept payments by PayPal.
    [/themedy_alertbox]

  • Using DreamWeaver with SFTP on Ubuntu EC2 instances

    Using DreamWeaver with SFTP on Ubuntu EC2 instances

    EC2 Linux Ubuntu VPS is not configured for connections with a password by default. This is a requirement for using SFTP with Adobe DreamWeaver.

    This is a how to configure the VPS server to accept connections using SFTP with password authentication.

    Allow login with password

    Open the SSHD config file:

    nano /etc/ssh/sshd_config
    

    Find the line:

    PasswordAuthentication no
    

    and change it to:

    PasswordAuthentication yes
    

    Stop the user from watching other areas of the server

    NB: This is currently not working:

    At the end of the file add the following sentences:

    Match Group sftpusers
    ChrootDirectory /var/www/%u
    ForceCommand internal-sftp
    

    Save the file. Then restart the SSH server.

    service ssh restart
    

    Create the restricted SFTP user group

    You will now create a SFTP group:

    sudo addgroup sftpusers
    

    Create the SFTP only user and add him to the group sftpusers

    Replace “USER” with your username.

    useradd -d /var/www/ -s /usr/lib/sftp-server -M -N -g sftpusers "USER"
    

    Now give “USER” a password:

    passwd "USER"
    

    Then add the user to another group:

    usermod -a -G www-data "USER"
    

    Create the user homedir and website root dir

    We are starting with creating the folder that will be the home directory for the user and the root folder for the website.
    Replace “DOMAIN” with your domain.

    sudo su
    cd /var/www/
    mkdir -p /var/www/"DOMAIN" /var/www/.ssh
    chown "USER":sftpusers /var/www/"DOMAIN" /var/www/.ssh
    chown "USER":www-data /var/www/"DOMAIN" /var/www/.ssh
    sudo chown -R www-data /var/www
    chmod 700 /var/www/.ssh
    

    Create the website in apache.

    cd /etc/apache2/sites-enabled
    ls
    

    Duplicate and modify an existing  site or create at new site
    as described in this how to:
    How to add a websites to EC2 Ubuntu LTS instances

    Add a shell to the group

    nano /etc/shells
    

    Add the following to the bottom of the file and save:

    /usr/lib/sftp-server
    

    References

    How to set up an SFT user to login with a password to an EC2 ubuntu server?

    Setting up SFTP on Ubuntu

    Ubuntu SFTP-Only Account How-to

  • DotNetNuke to WordPress migration

    DotNetNuke to WordPress migration

    Offline migration using MarsEdit 3

    If you have small number og artickles a solution might be to open the DotNetNuke articles in the offline editor MarsEdit 3 and the re-publish them to your new WordPress. This requires som work, but it’s budget friendly. It’s also a fast way to correct minor issues that might occur during or after the move.

    Companies performing DotNetNuke to WorPress migration

    Some companies spezialize in migrating between CMS’s. It’s well wort the money using these services in stead of figuring out the everything yourself.

    gConverter

    CMS2CMS

    [themedy_alertbox icon=”thumbs-o-up” colour=”green” font_awesome_att=”” custom_colour=””]

    Call TBT when you need help

    Ask for a quote. We are always here to help.  We also work by the hour at $ 99,- USD.  We accept payments by PayPal.

    [/themedy_alertbox]

    How To migrate from DotNetNuke to WordPress

    Searching google for:

    convert dotnetnuke to wordpress
    migrate dotnetnuke to wordpress
    move dotnetnuke to wordpress
    

    Should provide you with plenty of sources for performing the job yourself.

    Here are som:

    From DNN to WordPress

    Moving DotNetNuke to WordPress, need .htaccess help

  • Defining maximum memory in wp-config.php

    When adding new domain to your server add the follwing lines to wp-config.php

    sudo nano /var/YourFolder/wp-config.php
    

    Find the sentence reading:

    /* That's all, stop editing! Happy blogging. */

    Add the following lines just above

    define('WP_CACHE',true);
    define('WP_MEMORY_LIMIT','256M');
  • How to use Amazon RDS MySQL external database with WordPress

    How to use Amazon RDS MySQL external database with WordPress

    Setting up WordPress to use the Amazon RDS MySQL external database server on your VPS is easy.  Changing to an external database will boost stability  and possibly speed up EC2. Running Apache and MySQL server with heavy load could lead to that the MySQL database comes to a stop. Running the MySQL on a separate server makes you less vulnerable. When the workload gets to heavy. The first thing that happens could be that the MySQL database server stops. This is why using an external database server that never stops is such a good idea.

    (more…)