How to optimize WordPress with Ubuntu VPS

Ubuntu Virtual Private Server optimized for WordPress

Author: .

  • How to migrate many websites to JeOS

    This procedure could be the fastest if you have many websites. With one website or just a few websites it might be easier to migrate using the migration procedure as we have outlined in this post. If you are unable to migrate using UpdraftPlus Migrator using this manual procedure could help you out.

    Moving many WordPress sites

    Migrate the databases

    • Export the databases from the legacy server
    • Create empty databases on the new Amazon RDS
    • Import the database backup from the legacy server into the new RDS. Use command-line or use Sequel Pro, MySQL Workbench or Navigate to create an empty database and then import the data. The easiest and safest way is often to tunnel trough EC2 to RDS using SSH.

    Migrate files and folders

    • On the legacy server you should create a zip file of the file and folder system using this command:
    sudo zip -r website-files.zip /var/www/

    Copy the zip file to somewhere on the legacy server where it is available with a browser

    sudo mv /var/www/website-files.zip /var/www/html/website-files.zip

    On the new server download the zip file from the legacy server

    sudo wget https://www.domainname.com/website-files.zip

    Unzip.

    sudo unzip website-files.zip

    Then move the website content to the correct place on the new server.

     sudo cd /var/www/
    sudo cp -r . /var/www/

    Then remove the unzipped folder

    cd ..
    cd ..
    rm -r var
    
    • Change ownership of the files. It should be correct. We do this just to verify
    chown -R www-data /var/www/
    • If you haven’t already done this in previous steps: On the new, fresh server create empty databases in Amazon RDS. Import the database content from the old server into the databases
    • Change the database server name value in wp-config.php to point to the new RDS databases.
    • Change the username and password values in wp-config.php  to point to the new RDS databases if required.

    Migrate the Apache configuration

    Test by editing the hosts file on your PC

    • Here is a tip on how you can test everything without changing the DNS and go live. Prevent downtime by doing this. To make sure everything is OK before making the DNS edits it’s a good habit is to test by changing your hosts file instead of the public DNS. Editing the hosts file is often faster to do in a graphical environment than in command-line. We have made a list of graphical tools for editing the hosts file on OS X and Windows.

    How to create a zip from folders and archives on the legacy server

    To install the zip program:

    sudo apt-get install zip

    To use the zip program:

    sudo zip -r compressed_filename.zip folder name

    How to Unzip

    To install the unzip program:

    sudo apt-get install unzip

    To unzip a file use this command

    unzip file.zip -d destination_folder

    How to change the owner of the files

    After unzipping the folders, you should make sure that the owner and group of the data are correct.

    chown -R www-data /var/www/html

  • How to install Google PageSpeed with Amazon ElastiCache

    How to improve the page loading times on your website using Google mod_pagespeed module for Apache. The Google PageSpeed module can be set to use the Amazon ElastiCache for caching of files. This takes load of Ubuntu and lets you focus the memory to run Apache.


    After installing the Google PageSpeed module open the config file:

    sudo nano /etc/apache2/mods-available/pagespeed.conf

    Scroll down to the section:

    # If you want, you can use one or more memcached servers as the store for
    # the mod_pagespeed cache.
     ModPagespeedMemcachedServers

    Then add the address to your ElastiCache server.
    Save the config file.
    Restart Apache

    sudo service apache2 restart

    Change to Redis when it becomes available

    Redis is a faster and better cache that memcache.

    You shold change to redis when mod_pagespeed from Google starts to support Redis

    Verify that PageSpeed works correctly

    Your google page speed module has a web based reporting panel only available to localhost. You connect to the VPS server using SOCKS proxy through your SSHD server.

    To access the Google page speed panel use the default HTTP:// access without SSL and the internal IP of you EC2 server.

    The internal IP of your EC2  VPS server id displayed if you type

    ifconfig

    If the local IP of you EC2 VPS is 88.88.88.88 you can access the PageSpeed panel on the address:

    http://88.88.88.88/pagespeed_admin/console


    How to gain access to the PageSpeed panel

    Check that you still have the HTML root folder

    Check that you still have the default apache folder HTML

    cd /var/www/
    ls -a

    If the necessary create the folder

    sudo mkdir /var/www/html

    For your reference create an index.html file

    sudo nano /var/www/html/index.html

    Tape some reference text in the file and then save it.

    Then make sure that Apache can write to the folder

    sudo chown www-data:www-data -R /var/www/html


    Start the default port 80 Apache configuration

    Every active Apache config file represents a potential entry point for the bad guys to your VPS. Every active Apache config drains your VPS server for memory. That is why only the config files you need should be active. In this case, you should activate the config file when you need to access the Google PageSpeed stats. Afterwards, disable the config file to block it as a possible entry point for bad guys and free up the resources.

    To enable the config file:

    sudo a2ensite 000-default.conf
    sudo service apache2 restart

    To deactivate the config file:

    sudo a2dissite 000-default.conf
    sudo service apache2 restart
    

    Verify that you can access your server on port 80. If the local IP is 88.88.88.88, then you should be able to access the index.html file you have created in

    /var/www/html/

    by typing:

    http://88.88.88.88/index.html

    Don’t continue to the next step before this works

    Allow the local IP to access Google PageSpeed panel

    Open the page speed config file

    sudo nano /etc/apache2/mods-available/pagespeed.conf

    Use “Ctrl + w” to search for

    Allow from 127.0.0.1

    Then add the local IP for your EC2 VPS server.

    If the IP is 88.88.88.88 then this part of the config file would look like this:


     <Location /pagespeed_admin>
     Order allow,deny
     Allow from localhost
     Allow from 127.0.0.1
     Allow from 88.88.88.88
     SetHandler pagespeed_admin
     </Location>
     <Location /pagespeed_global_admin>
     Order allow,deny
     Allow from localhost
     Allow from 127.0.0.1
     Allow from 88.88.88.88
     SetHandler pagespeed_global_admin
     </Location>

    Save the config file.

    Restart Apache

    sudo service apache2 restart

    Connect to your VPS with VPN

    Finally, connect to your EC2 VPS server using SOCKS proxy VPN.

    The Google PageSpeed stats and info should now be able at:

    http://88.88.88.88/pagespeed_admin/console

    [themedy_button url=”https://www.wpjeos.no/socks-proxy/” icon=”wrench” font_awesome_att=”” label=”How to access your VPS through SOCKS VPN” colour=”blue” colour_custom=”” size=”large” edge=”rounded” target=”_self”]

  • How to auto update and upgrade Ubuntu server once a day with unattended upgrades

    Ubuntu 18.04 Manual

    Do you feel it’s a hassle with all the new packages that needs updating?
    Typing:

    sudo apt-get dist-upgrade
    

    Almost every week you log in to Ubuntu. Upgrades and updates should be automated. It’s done very easy once and for all. Just continue reading.

    The unattended-upgrades package is the best practice for automating the updating of Ubuntu. For headless machines like the WordPress JeOS VPS server, this is a major security gain and a great timesaver.

    You can set up unattended-upgrades by typing this in a terminal:

    sudo apt-get install unattended-upgrades

    Then configure unattended upgrades using this command:

    sudo dpkg-reconfigure unattended-upgrades

    That’s all. Ubuntu will now update itself every day.

    If unattended upgrades fail, then configure manually

    If not working as needed. Open the configuration files and customize to fit your needs.

    Documentation on how to customize the update and upgrade are available in the Ubuntu documentation.

    You can not use this tool to upgrade from Ubuntu 14 to Ubuntu 16. It will only upgrade and update packages.

    First, edit the config file:

    sudo nano /etc/apt/apt.conf.d/50unattended-upgrades

    Change the values to look like this:

    // Automatically upgrade packages from these (origin:archive) pairs
    Unattended-Upgrade::Allowed-Origins {
            "${distro_id}:${distro_codename}-security";
            "${distro_id}:${distro_codename}-updates";
            "${distro_id}:${distro_codename}-proposed";
            "${distro_id}:${distro_codename}-backports";
    };
    
    // List of packages to not update (regexp are supported)
    // Unattended-Upgrade::Package-Blacklist {
    //      "libc6-i686";
    // };
    

    The second file to edit is this one:

    sudo nano /etc/apt/apt.conf.d/10periodic

    Change it to look like this:

    ::Periodic::Update-Package-Lists "1";
    APT::Periodic::Download-Upgradeable-Packages "1";
    APT::Periodic::AutocleanInterval "7";
    APT::Periodic::Unattended-Upgrade "1";


    Automatic unattended updates for Ubuntu 20.04 LTS

    Test if it already installed:

    sudo unattended-upgrades --dry-run

    Run the upgrade:

    sudo apt update && sudo apt upgrade

    sudo nano /etc/apt/apt.conf.d/50unattended-upgrades

    Sending e-mail:

    sudo apt install bsd-mailx

    sudo apt install apt-listchanges

    sudo nano /etc/apt/listchanges.conf

    Change to:

    email_address=t@tbt.biz

    Postfix log

    sudo nano /var/log/mail.log

    Remove log

    sudo rm /var/log/mail.log

    Restart Postfix

    sudo systemctl restart postfix

    Flush e-mail queue

    sudo postqueue -f

    Sources

    Set up automatic unattended updates for Ubuntu 20.04

    Set Up Automatic Security Update (Unattended Upgrades) on Ubuntu

    Set up automatic unattended updates for packages from ondrej

    Using Unattended-Upgrades on Debian and Ubuntu

    "LP-PPA-ondrej-php:${distro_codename}";

  • How-to WordPress load faster for better SEO

    How-to WordPress load faster for better SEO

    To check how fast your pages load try these tools:

    Pingdom Website Speed Test
    http://tools.pingdom.com/fpt/


    Google PageSpeed Insights
    http://developers.google.com/speed/pagespeed/insights/

    • Page Speed, an open source Firefox/Firebug add-on that evaluates the performance of web pages and gives suggestions for improvement.
    • YSlow, a free tool from Yahoo! that suggests ways to improve website speed.
    • WebPagetest shows a waterfall view of your pages’ load performance plus an optimization checklist.
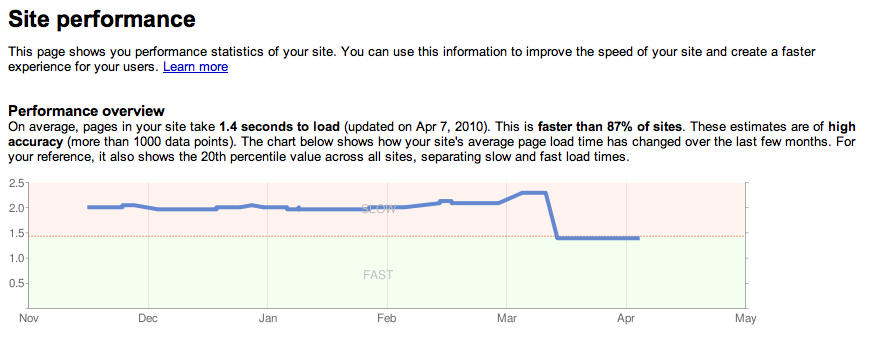
    • In Webmaster Tools, Labs > Site Performance shows the speed of your website as experienced by users around the world as in the chart below. We’ve also blogged aboutsite performance.


    Infographic about webpage speed (pdf)


    Why speed matters

    According to the Aberdeen Group, a one second delay in page-load time equals 11% fewer page views, a 16% decrease in customer satisfaction, and 7% loss in conversions.

    According to the UK: Internet Statistics Compendium which includes Data from Rackspace,  38% of UK online shoppers abandon websites or apps that take more than 10 seconds to load. 

    Speed is a metric used by Google to rank search results, Google considers a page to be ‘slow’ if it takes longer than 1.5 seconds to load.

    74% of users will leave after waiting five seconds for a mobile site to load.

    According to surveys done by Akamai and Gomez.com, nearly half of web users expect a site to load in 2 seconds or less, and they tend to abandon a site that isn’t loaded within 3 seconds. 79% of web shoppers who have trouble with web site performance say they won’t return to the site to buy again and around 44% of them would tell a friend if they had a poor experience shopping online.

    Facts and Stats about pagespeed

    • 73% of mobile internet users say that they’ve encountered a website that was too slow to load. »tweet«
    • 51% of mobile internet users say that they’ve encountered a website that crashed, froze, or received an error. »tweet«
    • 38% of mobile internet users say that they’ve encountered a website that wasn’t available. »tweet«
    • 47% of consumers expect a web page to load in 2 seconds or less. »tweet«
    • 40% of people abandon a website that takes more than 3 seconds to load.»tweet«
    • A 1 second delay in page response can result in a 7% reduction in conversions. »tweet«
    • If an e-commerce site is making $100,000 per day, a 1 second page delay could potentially cost you $2.5 million in lost sales every year. »tweet«


    This is why you should consider using a VPS server and not shared hosting

    Shared hosting simply means that many websites are hosted on a single web server, and that the server’s resources (CPU and RAM) are shared among every customer account on the machine.

    Shared hosting plans are pretty cheap but this does not mean they are not good. The major word that causes problems for shared hosting users is the word “Unlimited“.


    Sources for this article:

    http://blog.kissmetrics.com/loading-time/

    http://googlewebmastercentral.blogspot.no/2010/04/using-site-speed-in-web-search-ranking.html

    http://wpseer.com/wordpress-plugins-to-avoid/

    http://blog.kissmetrics.com/speed-is-a-killer/

  • How-to write. Tips and notes.

    The headline should be between 6 and 8 words

    Text should be between 300 and 700 words pr page.

    How-to articles are always a winner

  • Howto install WP-CLI Ubuntu 16 and later update

    Howto install WP-CLI Ubuntu 16. This is a easy and straight forward process. Takes just a few minutes.

    Check for any news on the WP-cli homepage

    Issue the following commands:

    cd /tmp
    wget https://raw.githubusercontent.com/wp-cli/builds/gh-pages/phar/wp-cli.phar

    The file wp-cli.phar needs to be executable.

    chmod +x wp-cli.phar

    Set permission to copy WP-CLI to /usr/local/bin/

    Important: Do not use “sudo” when moving WP-CLI to /usr/local/bin/

    sudo chown -R ubuntu /usr/local/bin/

    And then

    sudo chgrp -R ubuntu /usr/local/bin/


    Move wp-cli.phar to the bin directory.
    Then rename wp-cli.phar to “wp”.
    This makes it easier to use the app:

    mv wp-cli.phar /usr/local/bin/wp

    To test that everything works as it should issue the command:

    wp --info

    To update WP-CLI to newest version

    As Ubuntu user run the command:

    wp cli update
  • Ubuntu WordPress command-line tools gives you speed, power, flexibility and beauty

    Ubuntu wordpress command-line interface. Beauty of command-line. Flexibility of command-line. Speed of command-line. Power of command-line. Configuring, administering, correcting errors, upgrading and everything else should be done by the command-line from your mobile, tablet or PC. Command-line saves you time and money.

    The command-line interface or command language interpreter – CLI – is also known under the name command-line user interface, console user interface and character user interface – CUI -. This means no graphic. Just characters on a screen. The command-line provides you with a concise and powerful tool to work with Ubuntu and WordPress. No matter how slow your connection is the command line is always lightning fast.

    Ubuntu WordPress command-line tools gives you speed and power

    Some of the advantages of managing Ubuntu and WordPress by the command-line:

    • Saves you time and money.
    • Requires very little  bandwidth.
    • Is almost always lightning fast.
    • Easier to automate through scripting.
    • Requires fewer resources.
    • Concise and powerful.
    • Expert friendly.
    • Gives you a good and beautiful feeling.

    SSH client

    An SSH client is essential for managing the JeOS WordPress VPS server. Pretty much everything related to Ubuntu is done with the SSH client. In TBT we have been using VSSH for many years and made this our preferred SSH client.  WP-CLI is in most cases also running in the SSH client windows.


    Read more about the VSSH client for iPhone


    Read more about the VSSH client for iPhone


    Read more about the VSSH client for Windows


    Read more about the VSSH client for Android


    WP-CLI

    WP-CLI is the free tool for managing WordPress without a web browser. WP-CLI has numerous add ons.

    More about WP-CLI

    Gravity Forms WP-CLI plugin

    Gravity forms is one of the best forms plugins. Gravity forms has a large number of plugins.

    Manage Gravity form using command-line

    WordShell

    You can upgrade 100 or 1.000 WordPress sites by typing a single command in WordShell. Batch manage sites and save heaps of time. WordShell is not based on PHP and does not require WordPress to work. This provides many opertunites that’s not available with WP-CLI

    Compare WordShell to WP-cli

    Read more about WordShell 

    No thanks, I prefer cPanel and other GUI’s

    If you decide that command-line is not your way thats OK to. cPanel is rated one of the best GUI’s to administer Linux and WordPress.

    [themedy_button url=”https://www.wpjeos.no/out/012-webhosting-uk-com-vps” icon=”wordpress” font_awesome_att=”” label=”Read more about WordPress VPS with cPanel control panel” colour=”blue” colour_custom=”” size=”large” edge=”rounded” target=”_self”]


    [themedy_button url=”https://www.wpjeos.no/out/015-one-com” icon=”wordpress” font_awesome_att=”” label=”Read more about WordPress hosting with One.com” colour=”blue” colour_custom=”” size=”large” edge=”rounded” target=”_self”]


    [themedy_button url=”https://www.wpjeos.no/out/012-webhosting-uk-com-webhosting” icon=”wordpress” font_awesome_att=”” label=”Read more about WordPress hosting with WebHosting UK” colour=”blue” colour_custom=”” size=”large” edge=”rounded” target=”_self”]

     
    [themedy_button url=”https://www.wpjeos.no/out/016-proisp-no” icon=”wordpress” font_awesome_att=”” label=”Read more about WordPress hosting with Pro ISP” colour=”blue” colour_custom=”” size=”large” edge=”rounded” target=”_self”]