How to optimize WordPress with Ubuntu VPS

Ubuntu Virtual Private Server optimized for WordPress

Author: .

  • How-to Ubuntu 16 Amazon Web Services AWS EC2 RDS ElastiCache WordPress

    DIY: How-to set up Ubuntu 16 AWS EC2 with external RDS MySQL database and external ElastiCache memcached server. The title is quite cryptic on purpose to tell you that this is somewhat different from the standard WordPress VPS where everything depends on a single Linux server.

    This combination gives you a fast, stable and affordable VPS server based on the concept of JeOS. You will have a budget friendly VPS server that will scale to what you need. Only limited of your needs and your budget. It contains only what WordPress needs to run and nothing else. JeOS is in this context a paradigm for optimizing your operating system to fit the needs of WordPress.

    In this DIY tutorial you will learn how-to set up WordPress with the following configuration:

    • WordPress
    • SSL – https:// with certificate from CloudFlare
    • Amazon AWS EC2 VPS server
    • Ubuntu 16 LTS
    • Apache
    • PHP 7
    • External Amazon RDS MySQL database server. MySQL version 5.7
    • External Amazon ElastiCache memcached server
    • Google PageSpeed module
    • Using Google gMail or Google Apps for Work as SMTP server
    • Automatic update of Ubuntu every day
    • Timezone set to Oslo, Norway
    • CloudFlare CDN, performance and security
    • Configure the Amazon Web Services firewall to only allow connections on port 443 and 22 from selected IP adresses
    • Protecting WordPress admin section using .htaccess with IP rules
    • Forwarding all non-SSL traffic to the httpS:// version of wordpress
    • Automatic backup of WordPress
    • Backup of Ubuntu


    [themedy_button url=”https://www.wpjeos.no/wordpress-jeos-concept/” icon=”flash” font_awesome_att=”” label=”More about the WordPress JeOS concept” colour=”blue” colour_custom=”” size=”medium” edge=”straight” target=”_self”]


    Ubuntu 16 AWS EC2 initial activation of the VPS server

    After signing up and activating your account with Amazon Web Services it’s time to chose the right image.


    [themedy_button url=”https://www.wpjeos.no/out/008-aws-free” icon=”chevron-circle-right” font_awesome_att=”” label=”Sign up for a Amazon AWS account” colour=”blue” colour_custom=”” size=”large” edge=”rounded” target=”_self”]


    [themedy_button url=”https://www.wpjeos.no/activating-ec2-ubuntu-16/” icon=”chevron-circle-right” font_awesome_att=”” label=”Chose your Ubuntu 16 VPS image” colour=”blue” colour_custom=”” size=”large” edge=”rounded” target=”_self”]


    Buy this VPS server preconfigured for USD 180,- $

    This page is a DIY guide. When you run into problems or just want to get this server production ready as soon as possible. No problem. We will prepare it for you if you pay us for the time we spend configuring it. You get a server with 1 GB of memory, 30 GB SSD disk and 1 processor. Want another hardware configuration? No problem. Just contact us. One hour of support using email, phone, FaceTime and TeamViewer is included. Do you need additional work? No problem. We charge USD 95,- $ pr hour outside Norway.  Check out the TBT profile on TrustPilot to see what others thinks of TBT.
    [themedy_button url=”https://www.wpjeos.no/out/000-kontakt” icon=”plug” font_awesome_att=”” label=”Order your plug and play WordPress VPS server now!” colour=”blue” colour_custom=”” size=”large” edge=”rounded” target=”_self”]


    [themedy_button url=”https://www.wpjeos.no/out/006-trustpilot” icon=”bookmark-o” font_awesome_att=”” label=”Visit TrustPilot to see what our customers thinks of TBT” colour=”blue” colour_custom=”” size=”large” edge=”rounded” target=”_self”]


    [themedy_button url=”https://www.wpjeos.no/hire-freelancer/” icon=”user-md” font_awesome_att=”” label=”Need more choices?   Hire a freelancer to help you” colour=”blue” colour_custom=”” size=”large” edge=”rounded” target=”_self”]


    How to migrate your WordPress to the JeOS VPS with Migrator

    Moving your current WordPress site to this VPS server is usually a straight forward process. All you need is the Migrator module. This module makes it easy to move your site and even change the domain name to a new and better URL.

    [themedy_button url=”https://www.wpjeos.no/out/006-trustpilot” icon=”wrench” font_awesome_att=”” label=”Read more about how to move WordPress with the Migrator module” colour=”blue” colour_custom=”” size=”large” edge=”rounded” target=”_self”]




  • WordPress JeOs concept

    JeOS is pronounced juice. Its means Just Enough Operating System. Thats just what this is about. The idea is to run only what WordPress needs and nothing else. JeOS is in this context a paradigm for optimizing your operating system to fit the needs of WordPress. We are also lifting weight of the VPS server by moving services into the cloud.

    A stripped down and cloudish VPS server

    By unloading the Ubuntu VPS server with as much as possible, you will run a VPS server that requires less resources than the traditional WordPress VPS server. This is because many of the core services are moved to different cloud services. By cloudifying your WordPress VPS server things get simpler, easier, faster, budget minded, faster, more robust and easier to troubleshoot because you can isolate the different processes.

    We recommend the JeOS concept when running WordPress

    Following the JeOs concept makes your Ubuntu VPS smaller, faster and potentially more secure. There is fewer access points for hackers. Fewer possible points of failure. The JeOs WordPress concept has many advantages. This is some of them:

    • Needs less memory
    • Needs less CPU
    • Needs less storage
    • Needs less bandwidth due to CloudFlare CDN
    • Less expensive. Amazon AWS Charges for what you use.
    • Potentially faster
    • Potentially safer
    • Potentially fewer points of failure
    • Easier to upgrade
    • Easier to migrate
    • External MySQL server using RDS
    • External memcached server using ElastiCache
    • External CDN – Content Delivery Network – using CloudFlare
    • External minify and other optimizing techniques using CloudFlare
    • External origin network optimizer using CloudFlare Railgun results in an average 200% additional performance increase. (Add-on)
    • Easier troubleshooting because processes running in the cloud can be isolated.
    • Administration of Ubuntu using a SSH client on your mobile, tablet or PC
    • Administration of WordPress with your mobile, tablet or PC using WP-cli
    • Administration of WordPress with your mobile, tablet or PC using WordShell
    • Almost unlimited scalable
    • No graphical admin panel that will drain memory, cpu, storage and other computing resources, create points of failure and require license.
    • Easier and faster move to Ubuntu 18 LTS or Ubuntu 20 LTS in due time. The Ubuntu 16 LTS distributions is coming to it’s End of Life after a number of year. At that time it should be quite easy to set up a new JeOS EC2 Ubuntu 18 LTS or Ubuntu 20 LTS VPS server from scratch. Then use UpdraftPlus or another backup plugin to move WordPress to a fresh new server. For a number or reasons are we recommending to set up a new, fresh JeOS VPS server in stead of upgrading the current outdated server.
    • Google Tag Manager to handle tags from AdWords, Google Analytics, Bing AdCenter, Facebook and most other tags.
    • The Google PageSpeed module uses ElastiCache to take load of the VPS server and speed up everything by optimizing.


    You can use this series of How-to’s to set up your own JeOS server or order a prebuilt server from us. We are also available if you need help. There is also lot’s of freelancer ready to help you.

    [themedy_button url=”https://www.wpjeos.no/hire-freelancer/” icon=”binoculars” font_awesome_att=”” label=”Find a freelancer to build you JeOS WordPress VPS” colour=”blue” colour_custom=”” size=”large” edge=”rounded” target=”_self”]

     

    [themedy_button url=”https://www.wpjeos.no/out/009-jeos” icon=”binoculars” font_awesome_att=”” label=”Order a prebuilt WordPress JeOS VPS server” colour=”blue” colour_custom=”” size=”large” edge=”rounded” target=”_self”]

  • Activating EC2 Ubuntu 16

    Start with the Ubuntu AMI locator. Use the menu at the bottom of the page. Narrow and filter your choices  to the right version. Chose an AMI with:

    • Zone: The zone closest to your users and customers. We use eu-west 1 for Norwegian sites.
    • Name: Xenial
    • Version: 16.04 LTS
    • Arch: amd64
    • Instance Type: hvm:ebs-ssd
    • AMI-ID:  ami-07174474 was the most recent in EU-WEST in November 2016. Check for a newer in your region!

    Log into your account on AWS. Then double click on the link of the AMI-ID you have chosen. Then this AMI will be added to your account.

    [themedy_button url=”https://www.wpjeos.no/out/017-ubuntu-ami-finder” icon=”anchor” font_awesome_att=”” label=”Locate you AMI here” colour=”blue” colour_custom=”” size=”large” edge=”rounded” target=”_self”]
  • Hire freelancer

    Hire freelancer

  • Install GD on Ubuntu

    Install GD on Ubuntu

    The WordPress plugin Imsanity requires GD to work.

    This is the error message you might get:

    Oh Snap! Imsanity was unable to resize this image for the following reason: ‘No editor could be selected.’ . If you continue to see this error message, you may need to either install missing server components or disable the Imsanity plugin. If you think you have discovered a bug, please report it on the Insanity support forum

    Install GD on Ubuntu is a straight forward task

    To check if Ubuntu already has GD installed:

    php7.0 -m | grep -i gd


    If GD is installed then it should print:

    gd

    If there is no answer, then you should install GD with this command:

    sudo apt-get install php7.0-gd

    Reboot the server or at least restart apache to make GD start working.

    To restart the server:

    sudo reboot now

    To reboot apache:

    sudo service apache2 restart

    Detailed information about GD

    To get mor info about your GD installation type this command:

    php7.0 -i | grep -i --color gd

    OR

    php -i | grep -i --color gd

    The output could look like this:

    /etc/php/7.0/cli/conf.d/20-gd.ini,
    gd
    GD Support => enabled
    GD headers Version => 2.1.1
    GD library Version => 2.1.1
    gd.jpeg_ignore_warning => 0 => 0
    

    gdlogobig

    Alternative solution to verify that GD is installed

    Create a file called test.php with the following content:

    <?php
    phpinfo(); 
    ?>
    

    Place test.php your web server root directory such as

    /var/www/

    Run test.php as follows:
    http://your-domain/test.php

    Look for GD extension in the long page that is displayed about you PHP configuration.

  • Image ad sizes for Adwords Twitter and Facebook

    Image ad sizes for Adwords Twitter and Facebook

    Image ad sizes should be correct to present the beste experience for the customer. It’s a god habit to create all the ads at once in Photoshop and then publish them to the different ad providers.

    Image ad size for Twitter is 800 x 320

    Twitter uses a image that is 800 pixels wide and 320 pixels high for the website card.

    Facebook recommends images that is 1.200 wide and 628 high for use in ads
    How to find the correct size for images to be used as ads on Facbook

    Image ad size for Facebook is 1.200 x 628

    Facebook uses a image that is 1.200 pixels wide and 628 pixels high in general.

    Read more on this Facebook page about ad dimensjons

    Facebook’s 20-Percent Text Rule on Ad Images

    Ads that have more than 20% of text in their image won’t be approved to run on Facebook or Instagram. Too much text can look like spam and make people think that your ad is low quality. Make sure to use the headline and body of your ad to tell people more about why you’re advertising and what you want them to do. Read more about the 20% text Facebook rule here.

    You should use the Facebook grid tools to check if your image is allowed by this policy.

    How to find the correct image size for photos used in AdWords
    How to find the correct image sizes for AdWords to be visible on all available ad places?

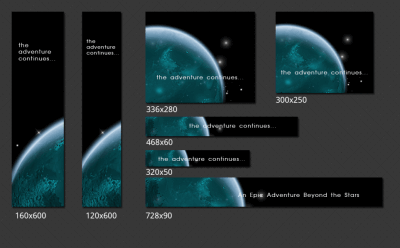
    Image ad sizes for AdWords is 20 different image ad sizes, plus, plus

    Adwords requires at least twenty different images when you want to utilize all the available ad spaces. AdWords image ad sizes is a true maze. There is 20 standard dimensjons and in addition to this there is different regional sizes. An overview is available here. In addition to this the wizard that generates HTML5 ads and other specialized ads requires other image sizes. In addition to the this the requirements tend to change periodically.

    We thin it’s helpful creating a set of layered Adobe Photoshop files that we use as templates. This is the list of sizes uses when creating Adwords ads by default:

    What Adwords image ad sizes you should I create for my ad campaign
    Creating the right image sizes with ads for AdWords is almost like navigating through a maze. This is the standard list we use in 2015.
  • Tools to autmate and speed up you workday

    Alfred

    https://www.alfredapp.com/remote/


    Blog about automating MAC

    http://macautomationtips.com/


    TextExpander