Moving WordPress to a new server or changing the domain name is usually an easy and straight forward task. Please contact me if you need advice or help on moving your WordPress site to a new server or to a new domain. Usually, you can get a fixed price for the job. Please contact me for a quote.
Manually move WordPress to a new server with a new domain
Disable all plugins
Create a backup of your database.
Create a backup of WordPress.
At the menu «Settings» – «General» change to a new domain.
Create a new backup of the database and a backup of all the files.
Restore the database and the files on the new server.
In the file wp-config.php change the name of the database, user and password if needed
In .htaccess change to a new domain name if needed
If needed add the following to lines of code to you wp-config.php file:
Relocate WordPress WordPress supports an automatic relocation method intended to be a quick assist to getting a site working when relocating a site from one server to another.
Activate your plugins one-by-one. If something bad happens then you will know which plugin that has created the trouble.
Change all the links. You can do this directly in the database or use a link checker plugin for WordPress. In the MySQL database go to the value
wp_options
Find the values
site_url
And
home
Change these values to the new domain.
Change the traffic from the old domain to then new domain
To avoid losing your ranking on the search engines and losing visitors the most favorable technique is to use a redirect 301 statement in your .htaccess file. Do this:
On Amazon AWS EC2 VPS server it might be useful to mount a 2. hard disk drive. Maybe your primary disk is full. This is how it’s done.
Recover data from a EC2 VPS instance with Ubuntu that won’t boot
Sometimes you need to restore files from a snapshot or a volume that wont boot. In this case the volume could be opened by mounting it as a 2. drive on a temporary EC2 instance. This procedure is useful if your EC2 instance is unable to boot. Then you can set up a new ECS VPS server and mount the non bootable disk as a second disk and extract the files from it. Need help? Don’t hesitate to contact me.
First see if the drive is attached with this command:
sudo fdisk –l
You will get a listing of available drives. If the drive already exist it will reveal itself with this line:
Disk /dev/xvdf: 10.7 GB, 10737418240 bytes
Now format the disk with this command, if you haven’t already done so:
sudo mkfs -t ext4 /dev/xvdf
Create a directory where the drive should be mounted:
mkdir /mnt
This is it. Now you can mount the drive with the command:
sudo mount /dev/xvdf /mnt
Check if the disk has been mounted correctly with this command:
mount -l
You should get this result:
/dev/xvdf on /mnt1 type ext4 (rw)
Mount on startup
Set the drive to mount automatically on system startup with adding a line to the configuration file:
sudo nano /etc/fstab
and add this line to the file:
/dev/xvdf /mnt1 auto defaults,nobootwait 0 0
Save the file and exit Nano.
Reboot the server to check that everything works correctly
After reboot you can access the new drive with the command:
cd /mnt1
mkdir /www.tbt.no
That’s it.
Your new root folder for Apache is ready for use at the address:
Your server might be more stable if you restart the apache service once a day, once a week or once a month. You can do this by adding a single line of text in the «Cron» service on your apache server.
This command restarts the Apache service every morning 04:00 AM. That’s properly when there are few visitors. Takes a few seconds and properly is the users not noticing the downtime.
Start Cron. First time you run this command you will probably be asked which text editor you want to use. I recommend that you choose Nano.
sudo crontab -e
In the text editor Nano, just add the following line. Then save and close the text editor Nano. That’s all
Sometimes the WordPress admin dosen’t behave as expected when using CloudFlare. Her are some advice that could help:
Alternative A.
Turn off Cloudflare while upgrading or performing troublesome tasks
The fast and easy way is to disable CloudFlare while editing your WordPress site. Then enable it when finished. Pausing CloudFlare is probably the easiest way.
Use the «Page Rule» to create an exception. You do this in the admin panel.
With page rules the admin panel should work like before you changed to CloudFlare.
The downside is that you sacrifice security to get better usability.
Being able to edit the hosts file is a valuable tool for any web developer. If you are a http://CloudFlare.com customer, you can bypass the CloudFlare systems by using a hosts file and direct the traffic directly from your computer is to the server. If you are moving WordPress site from one server to another server, then you can test that the website works correctly on the new server before you change the DNS setting. This way you can avoid any downtime the service. The hosts file enables you to create a website before the domain is effective or before the domain is being registered. Reason for this is that the host file will override the DNS services. You can also create our update website locally on your computer while the production site is still running on the Internet.
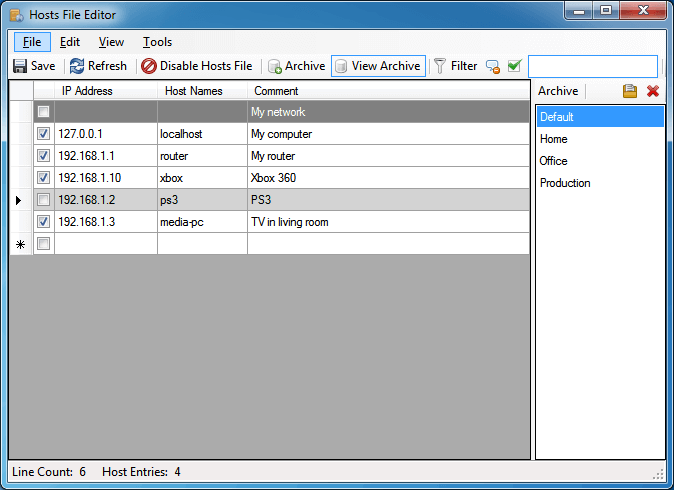
With at graphical user interface for the hosts file changes are made in a snap, and you can reload so that the services takes effect immediately. Here is a list over MAC and Windows Graphical Interface.
Hostbuddy is the easiest way to manage and update the /etc/hosts file on your Mac. Add new entries and turn on and off existing ones with one click. It’s perfect for switching between staging and production servers or just for testing out your new website before it goes live.
You should actively use the hosts file already on your computer. What it Does
Quickly add host entries without using the command line
Hosts are a system preference pane to manage your hosts file.
Hosts add a preference pane to your system preferences which let you toggle your host file entries on and off, as well as add and remove them.
Hosts.prefpane likes to keep your hosts file clean. When an entry is toggled off, it is not commented out in the hosts file but instead stored in the app’s preferences storage. This means you will have to uncomment all your unused host entries and untoggle them in the pane if you want to use them. Comments are treated as comments and will never show up in the list of host entries!
Of course, Hosts.prefpane will detect edits you made to the /etc/hosts directly and merge them into the listing.
Backups of your hosts file is made in ~/Library/Application Support/Hosts. The backup or your hosts file from before you started using Hosts.prefpane is called hosts.orig and each session a backup is made called hosts.session.
The default host entries that are needed by the OS are hidden and can not be edited using Hosts.prefpane.
Blue life hosts editor is a Portable Freeware hosts-file editor. It Allows you to add easily/delete, Block, Update domain names to your hosts file. Simply type the hostname you wish to add and use “Resolve domain name and add into the list” button.
When you type a domain name in your browser that you wish to connect to, your application must first convert it to an IP address that it will use to connect to.The way these hostnames are resolved to their mapped IP address is called Domain Name Resolution. On almost all operating systems whether they are Apple, Linux, Unix, Netware, or Windows the majority of resolutions from domain names to IP addresses are done through a procedure called DNS. DNS stands for Domain Name System. IT is the standard domain name resolution service used on the Internet. There is another way to resolve domain names without using the Domain Name System, and that is by using your HOSTS file. Almost every operating system that communicates via TCP/IP, the standard of communication on the Internet, has a file called the HOSTS file. This file allows you to create mappings between domain names and IP addresses Another way to think of a hosts file is like an address translator and redirector.
http://www.abelhadigital.com/hostsman
HostsMan is a freeware application that lets you manage your Hosts file with ease.
Easy way to manage your host file with a GUI on any windows computer.
While you can always manually manage or edit Hosts file manually, I would like to suggest that you use a third-party freeware tool like HostsMan to do it.
HostsMan is a feature-rich tool that lets you add, remove, edit entries in the Hosts file. It also lets you easily add third-party Hosts lists that help in blocking malware sites and lets you easily enable or disable the hosts file. It includes a built-in hosts file updater & a hosts editor. It lets you scan the hosts file for errors, duplicates and possible hijacks – and also lets you create an Exclusion list. One more useful feature it offers is the Hosts file backup manager. Back up your Hosts file to a safe place and use it to restore it, should the need arise.
Features
Built-in hosts file updater
Enable/Disable hosts file
Built-in hosts editor
Scan hosts for errors, duplicates and possible hijacks
Hosts file backup manager
Exclusion list
Hostman also lets you Flush DNS cache.
Open Hosts with a text editor
Count the number of hosts
Find duplicates
Replace IP
Scan hosts for malicious entries
Rearrange hosts
Manage DNS Client Service
And more.
In short, it’s the only Hosts Manager that you will even need.
The main difference on this tutorial about EC2 WordPress setup is that we use a RDS database in stead of installing the database on the Ubuntu server. This saves considerable with CPU and RAM. When the EC2 VPS runs short of CPU and or memory, the first thing that suffers is the MySQL database. This again leads to that your WordPress goes down.
Use Sequel Pro, MySQL Workbench or Navicat create a empty database. The easiest way is to tunnel trough EC2 to RDS using SSH.
Download WordPress and create the root directory
Become admin on the server
sudo su
Create a directory where you will install WordPress.
mkdir /var/www/c.tbt.no
(replace c.tbt.no with your domain name)
Go to the home user area.
cd /home/ubuntu
Then dowload WordPress
wget https://wordpress.org/latest.zip
Unzip the package after installing the unzip utility.
apt-get install unzip
Unzip wordpress
unzip latest.zip
Copy WordPress to the correct folder
cd wordpress
cp -r . /var/www/c.tbt.no
(replace c.tbt.no with your domain name)
Remove the installation files from the home area
cd ..
rm -r wordpress
rm latest.zip
Check to se that the files and folders really are removed:
ls -a
EC2 WordPress setup
WordPress need permissions on the file system
Give permissions so that the WP updates will work.
chown -R www-data /var/www/c.tbt.no
Activate .htaccess
Sometimes you might need to activate .htaccess in the main apache config file. The config file is located here:
sudo nano /etc/apache2/apache2.conf
Search for the expression “Options Indexes FollowSymLinks“b. Do this by pressing “CTRL + W” and paste the expression into the Nano search field.
Find the following three lines:
 Options Indexes FollowSymLinks
 AllowOverride None
 Require all granted
Change the word “None” to “All”.
The correct version would look like this:
 Options Indexes FollowSymLinks
 AllowOverride All
 Require all granted
Then restart Apache
sudo service apache2 restart
Activate mod_rewrite
Sometimes you might need to activate mod_rewrite
a2enmod rewrite
– and then restart Apache
service apache2 restart
Add PHP-GD support to the Apache webserver
If you are running NextGenGallery you will ned this:
sudo apt-get install php7.0-gd
Add this to your php.ini file:
sudo nano /etc/php/7.0/apache2/php.ini
Add the following line:
extension=php_gd2.so
Run the WP installer to complete the EC2 WordPress setup
Go to your domain and run the installer.
Checking the Apache logs
If something is wrong then the log files could be an nice starting point.
nano /var/log/apache2/error.log
To delete the error log:
rm /var/log/apache2/error.log
Check the Apache log:
nano /var/log/apache2/access.log
Delete the Apache log:
rm /var/log/apache2/access.log
Restart Apache
service apache2 restart
Optional steps
Set up centralized administration using ManageWP. Set up SMTP sending from WordPress using Amazon SES and appropriate plugin. Buy a 3 year contract on your EC2 instance to get the best price.